
By Andres Altena – Data Science Consultant
Intro
Welcome to part 2 in our series looking at the different training modes that are available in AWS Sagemaker. In case you missed it Part 1 (where we looked at the inbuilt algorithms SageMaker has) is available here.
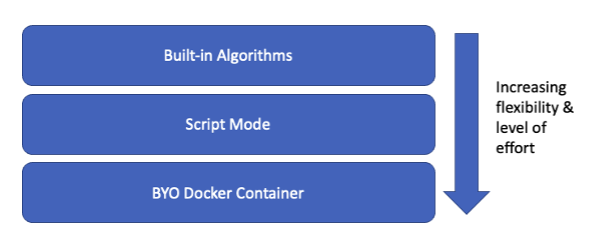
In this part we will look at Script Mode, for many the “goldilocks” method for setting up a training job, balancing flexibility and effort required:
Script Mode
Script Mode offers us a medium level of effort and freedom.
It allows you to take control of the training and inference process without having to worry about Docker. SageMaker will deal with creating and maintaining the Docker containers. This means you have the freedom to define the model, and we will explore how to do this in the demo section below.
It also supports several frameworks, and this number is always increasing:

If your chosen framework supports it, you will have to provide a script containing the training and inference code as an entry point for SageMaker. Within this script, you can define a few functions (some of which are required) to create your model.
Demo
We will split this demo into two main sections: defining the estimator, and the entry point script.
Defining the estimator
This will look remarkably similar to defining the estimator for the built-in algorithms. There are two main differences: you must import the framework, and you must provide the entry point.
from sagemaker.inputs import TrainingInput

from sagemaker.xgboost.estimator import XGBoost


session = sagemaker.Session()

script_path = "script_mode.py"

# Create Estimator

xgb_estimator = XGBoost(

##################################


entry_point=script_path,            # Path to script containing training and deployment code

source_dir=source_directory,        # Path to directory

dependencies=["my_custom_library"]  # Custom libraries

##################################

framework_version="1.5-1",  # Note: framework_version is mandatory

hyperparameters=hyperparams,

role=role, # Defined as sagemaker.get_execution_role()

instance_count=1,

instance_type=instance_type,

output_path=output_path,

)

# Convert data stored in S3 to TrainingInput type

train_input = TrainingInput(

"s3://{}/{}/{}/".format(bucket, prefix, "train"), content_type=content_type

)

validation_input = TrainingInput(

"s3://{}/{}/{}/".format(bucket, prefix, "validation"), content_type=content_type

)

# Train model

xgb_estimator.fit({"train": train_input, "validation": validation_input})
You will notice we have not only defined the entry_point, but also the source_dir and dependencies:
- entry_point – path to the script which contains the model. We will have a look at the script itself in a bit.
- source_dir (optional) – if you want to split your code into several files and import the necessary functions into your entry_point. This points to the directory where all other files are kept.
- dependencies (optional) – script mode supports adding custom libraries, and those libraries do not have to be in the same directory as your entry point Python script. You simply need to stipulate the custom library or other dependencies when defining your SageMaker training estimator.
Entry point script
There are a few key pieces to this script, and we will go through each of them in order of execution:
- Main guard clause: contains training code
- Model_fn: loads model saved after training
- Input_fn: deserialise inputs
- Predict_fn: apply model predictions to inputs
- Output_fn: serialise outputs
Main guard clause: contains training code
Because the SageMaker imports your training script, you should put your training code in a main guard (if __name__=='__main__':) if you are using the same script to host your model, so that SageMaker does not inadvertently run your training code at the wrong point in execution.
There are three things you want this ‘function’ to do: parse arguments, train the model, and serialise and save the model so that it is ready for inference. Looking at the code below, this is how we have split this main function. We will have a look at each of the separate functions independently.
if__name__ == "__main

    args, _ = parse_args()

    model = train()

    save_model(model)
Argument parsing – your user-defined inputs such as hyperparameters and location of data will pass as command-line arguments to the script. Use argparse to extract this information. These arguments have been passed in the form of hyperparameters, or as data locations, for example:

This is then parsed below in the line:
parser.add_argument("--train", type=str,

default=os.environ.get("SM_CHANNEL_TRAIN") )


def parse_args():

    """

    Parse arguments passed from the SageMaker API

    to the container

    """


    parser = argparse.ArgumentParser()


    # Hyperparameters sent by the client are passed as command-line arguments to the script

    parser.add_argument("--num_round", type=int, default=os.environ.get("SM_HP_num_round"))

parser.add_argument("--max_depth", type=int, default=5)

    parser.add_argument("--eta", type=float, default=0.2)

    parser.add_argument("--objective", type=str, default="reg:squarederror")

    parser.add_argument("--K", type=int, default=os.environ.get("SM_HP_K"))


    # Data directories

    parser.add_argument("--train", type=str, default=os.environ.get("SM_CHANNEL_TRAIN"))


    # Model directory: we will use the default set by SageMaker, /opt/ml/model

    parser.add_argument("--model_dir", type=str, default=os.environ.get("SM_MODEL_DIR"))


    return parser.parse_known_args()
Implement training – this will contain the training part of your algorithm. You will need the location of the training data and hyperparameters, both of which you have previously extracted using the parser.
def train():

"""

    Train the XGBoost model

    """


    K = args.K


    hyperparameters = {

        "max_depth": args.max_depth,

        "eta": args.eta,

        "objective": args.objective,

        "num_round": args.num_round,

    }


    # the csv is saved in the training channel which is passed as an argument

    train_df = pd.read_csv(f"{args.train}/train.csv", header=None)


    # Define training

    x_train, y_train = train_df.iloc[:, 1:], train_df.iloc[:, :1]

    dtrain = xgb.DMatrix(data=x_train, label=y_train)

    dvalidation = xgb.DMatrix(data=x_validation, label=y_validation)


    # Train the model

    model = xgb.train(

        params=hyperparameters,

        dtrain=dtrain,

        evals=[(dtrain, "train")],

    )

    return model

Serialise model – once the training is done, save the model within the correct directory. Your script will later load the model from this directory, so make sure you are saving and loading from the same location (ideally provided as an argument ‘model_dir’).

def save_model(model):

"""

    Serialise the model and save at the model directory specified in the

    args

    """

    model_location = args.model_dir + "/xgboost-model"

    pickle.dump(model, open(model_location, "wb"))

    logging.info("Stored trained model at {}".format(model_location) )
This code runs when the model is trained. Once this has been executed, your model is trained and saved within your model directory – ready to be loaded and used for inference.
model_fn: loads the model
Loads the trained model from the model directory. The way in which you load your model will depend on the model you are using. This function should be simple, usually 1 or 2 lines will be enough.
def model_fn(model_dir):

    """Deserialize and return fitted model.

    Note that this should have the same name as the serialized model in the train function

    """

    model_file = "xgboost-model"

    model = pickle.load(open(os.path.join(model_dir, model_file), "rb"))

    return model
input_fn: deserialises inputs
The input_fn function is responsible for deserializing your input data so that it can pass to your model. It takes input data and content type as parameters and returns deserialized data.
Some of the frameworks will have their own custom input_fn function, but I personally like defining this function so that I know exactly what data is passing to the model.
# Note this is not used for the xgboost example we have been looking at so far, as that is covered by the default input_fn

def input_fn(request_body, request_content_type):


    """

    Deserialize and prepare the prediction input

    """

    if request_content_type == "application/json":

        request = json.loads(request_body)

        train_inputs = torch.tensor(request)

        return train_uts

    else:

        raise ValueError("Input type not supported")
predict_fn: applies model predictions to inputs
The predict_fn function is responsible for getting predictions from the model. It takes the model and the data returned from input_fn as parameters and returns the prediction. There is no default implementation for the predict_fn. You must implement it yourself.
def predict_fn(input_data, model):

    """

    Apply model to incoming request

    """

    return model.predict(input_data)
output_fn: serialises outputs
The output_fn function is responsible for serializing the data that the predict_fn function returns as a prediction. Again, there is a default output_fn, but it is always good practice to define it yourself to fully understand what the model outputs are.
# Note this is not used for the xgboost example we have been looking at so far, as that is covered by the default output_fn

def output_fn(prediction, response_content_type):

    """

        Serialize and prepare the prediction output

    """

    if response_content_type == "application/json":

        response = str(prediction)

        return response

    else:

        raise ValueError("Output type not supported")
When should you use these?
You need to use a custom model, but do not have the time/experience to Dockerise and upload the model yourself. Personally, I’ve found myself using Script Mode mostly for simple pre and post-processing scripts.
Why shouldn’t you use it?
You want your models to be platform agnostic.
Your framework of choice is not supported.
The model you are planning to use is provided as a built-in algorithm.
AWS SageMaker Training Modes: Conclusion
This concludes our AWS SageMaker Training modes Part 2 blog. Stay tuned for the final part of our series (and the most flexible) – BYODC (Bring your own docker container) coming soon.
In the meantime, if you wish to discuss this series please get in touch with us.
